I’ve been on HyTech Racing for over 2 years now, designing and building electronic control systems for our electric vehicles. One problem I have noticed repeatedly is that not enough care is done to document our ideas and plans each year. My hope this year is to document as much as possible about how each part of the car that we are building works. If this is done well, this will help returning members but more importantly be a great resource to new members in understanding how a vehicle like ours needs to operate.
This is a project from 2015.
I have an RGB LED strip in my dorm room. It came with a controller/remote pair that has 16 color options and a few fading/flashing options. I thought it would be cool to control this strip via Arduino, so I looked for an online tutorial and found this one.
The LED strip runs on 12V and can pull a few amps, meaning that it cannot be directly powered by the Arduino. Instead, we can use transistors controlled by the Arduino. I used three IRF3710 MOSFETs to control the red, green, and blue channels. At first, I had ordered IRLZ34N MOSFETs on eBay. I had trouble getting them to work, and only after a lot of troubleshooting I found out that what I received in the mail was a different model MOSFET with a higher gate threshold voltage. The analogWrite() Arduino function is used to output a pulse width modulation (PWM) square wave to the gate terminal of each MOSFET. By adjusting the duty cycle from 0% to 100%, we can adjust how often the LED is on and therefore adjust its perceived brightness.
This summer I am taking CS2110 (Introduction to Computer Organization and Programming). For the last few weeks of the semester we are learning about C programming. One of the assignments is to create a Gameboy Advance (GBA) game. For this assignment, I decided to create a simple balloon popping game. Each balloon is drawn using horizontal lines as well as rectangles. Instead of redrawing the entire screen each frame, in most cases only the updated parts are redrawn. After submitting the assignment, I have worked on the game a bit more. I was able to use Bresenham’s Line Algorithm to draw a straight line from the laser pointer at the bottom of the screen to wherever the target is on the screen. This shows up when the player fires the laser.
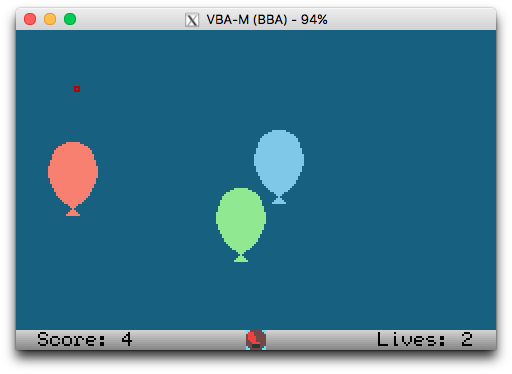
You can download a copy of the game to play in an emulator.
In 2014 I reinstalled Linux on my solid state drive, but kept the old installation. Around 80 GB of the 120 GB drive were being used to just to keep this old installation around. The new installation used around 15 GB for / and around 18 GB for /home. This caused problems with my day to day use, as /home filled up very quickly. The quick solution was to use a hodgepodge of symlinks and config changes to move things to a hard drive. Still, I was constantly having to deal with low disk space notifications and occasionally failed downloads.
This weekend, I finally decided to fix this the proper way, by first making an archive image of the old installation, then deleting that 80 GB partition and moving my /home partition to the 80 GB space on the drive.
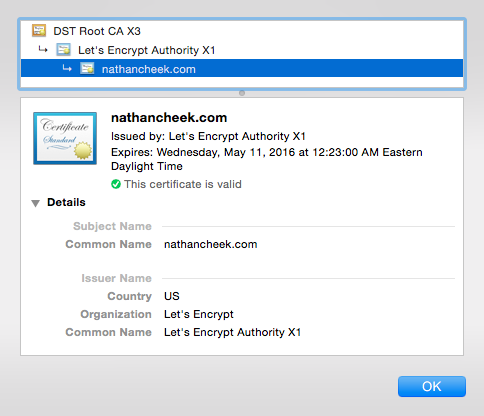
Now that I’m hosting my site on a full Linux vm, I can use Let’s Encrypt to encrypt connections to my website. As I found out, it is extremely easy to set up.